

This section will cover how to Add/Change/Remove assets registered in your CORTEX Service instance,
TLDR;
CORTEX Service has a prime Asset management functionality which is critical for creating and maintaining your Airports' Digital Twin. There are 2 methods to do your Asset management
-
You can use the “Edit Asset(s)” feature on the web for direct Asset changes - see Asset EDIT feature! V2023.02 Release info
-
Use the Export/Import function in the Asset table in order to get an excel file from your selected assets, which you can then transform to the installed base/correct information. The excel sheet (with structured headers and content) can then be imported into CORTEX Service with the option to update the instance data or remove all assets (from the instance or from a sub-area) and only have the asset in the sheet. This function allows you to keep your CORTEX Service instance up to date with the real installation. The only thing to make sure of is that the Asset types need to pre-exist in CORTEX Service before uploading the assets with that Asset type as a property. So make sure to create your Asset types beforehand!
Looking for an easy way to collect the different Product data field or location data when installing or receiving your products? Use our https://scan.airside.cloud/ Mobile Web App tool to create a list of your different products. More information on How -to Scan to Collect
Export function
In order to only change the information or data that you really want to change, it is good practice to first export the asset data from the assets that you would like to change in your system.
(To add assets into the system, you can use the sample template in order to have the correct headers and structure in your document ( see import Function).)
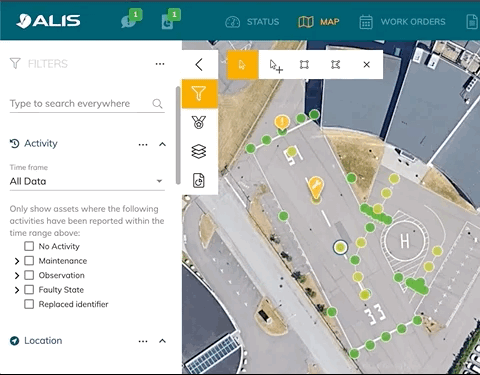
To export asset data - go to the MAP in the CORTEX Service web application and use the filters and selection tool to only select the assets where change is desired.
Now use the map functions Quick-tab to take you to the reporting section.
Select the asset scope and use the "Asset overview (Excel)" as the reporting template. Hit the Generate report button.
Import function
To add/remove assets to your instance or to change properties of an asset you can import a excel or CSV sheet, in a pre-defined structured.
Import method
The system needs to know how it needs to use that information in relation to the other assets that are in the system. You are able to use the following methods
-
Create / Update
-
Updates or creates the assets which are in the import files (no assets are deleted).
-
-
Replace assets by SubArea
-
Replaces all assets of the subareas mentioned in the import files.
-
-
Replace all assets
-
Replaces all assets in the system with the data from the import files
-
When updating asset data in your system it's a good idea to have an asset export as a backup in case you would delete unwanted assets.
(if all would be going wrong - you can always contact us so that we can play back an automatic backup of your instance to a certain date of choice)
Adding Assets - minimum requiremetns
When adding assets to the system, you will need all the minimum requirements for that asset to excist in the system.
These are the minimum information we need about an asset in order to create it in CORTEX Service.
Minimum requirements
-
Asset name
-
Asset type
-
Latitude/longitude or UTM*
-
Area and sub-area (aka : Light function and/or Runway /Taxiway location)
For CORTEX Service Basic users or if you have no location data of your asset
You may use a field alias when provided. Make sure your headers are unique!
You may find the data structure for the new assets in the next section.
File structure for Asset data import
Sample files
|
Type |
Simple |
Simple + Additional information |
|---|---|---|
|
EXCEL (LAT LONG) |
||
|
EXCEL (UTM) |
|
|
|
CSV |
Before you import new assets - make sure your assetClass/assetType is exciting in CORTEX Service!
Asset types need to be predefined in the system before uploading your assets linked to an asset type!
Go to your CORTEX Service instance → Settings→ Asset Types → verify if asset the Type is existing in the list under "Description" , if not → + NEW ASSET TYPE
Define and create the new Asset type. More information on how to create an manage asset types can be found here: CORTEX Service - Asset Type Management
More info on File structure of Import sheets...
|
Column header |
Alternative column header possibilities |
Required for new assets |
Required for asset changes |
Descripiton of field |
|---|---|---|---|---|
|
id |
assetId |
FORBIDDEN - may not be used for new asset additions |
OPTIONAL YES -if used as reference |
New assets can only be added if NO id is provided since the id is generated by the system itself. |
|
name |
assetName |
YES - for new assets
|
OPTIONAL YES -if used as reference |
The name that will be used in the system for that asset |
|
mainArea |
|
YES - for new assets |
OPTIONAL
|
Assets can be grouped in Main- and subarea's in order easily filter out grouped assets that belong together. Typical Main areas are:
|
|
subArea |
|
YES - for new assets |
OPTIONAL |
Assets can be grouped in Main- and subarea's in order easily filter out grouped assets that belong together. Typical Subareas are:
|
|
assetClass |
|
YES - for new assets
|
OPTIONAL |
The Asset Type of the Asset. |
|
latitude |
|
YES (when no utm is used) only in combination with longitude
|
OPTIONAL YES -if used as reference
|
The position of the asset on the map. You can verify the position by entering the position in Google maps If you want to bulk check your coordinates you can use the CSV import function of Google Earth + How to import CSV file in google earth
|
|
longitude |
|
YES (when no utm is used) only in combination with latitude OPTIONAL -for asset changes |
OPTIONAL YES -if used as reference |
see latitude |
|
utm |
|
YES ( when no latitude/longitude is used)
|
OPTIONAL YES -if used as reference |
You can verify you UTM coordinates here; |
|
serialNumber |
|
OPTIONAL |
OPTIONAL |
|
|
identifier |
|
OPTIONAL |
OPTIONAL |
|
|
lastModified |
|
OPTIONAL |
OPTIONAL |
|
|
inventoryId |
|
OPTIONAL |
OPTIONAL |
|
|
installationDate |
|
OPTIONAL |
OPTIONAL |
|
|
purchaseDate |
|
OPTIONAL |
OPTIONAL |
|
|
purchaseReference |
|
OPTIONAL |
OPTIONAL |
|
|
warrantyDate |
|
OPTIONAL |
OPTIONAL |
|
|
specialInstructions |
special |
OPTIONAL |
OPTIONAL |
|
|
genericText1 |
text1 |
OPTIONAL |
OPTIONAL |
|
|
genericText2 |
text2 |
OPTIONAL |
OPTIONAL |
|
|
genericText3 |
text3 |
OPTIONAL |
OPTIONAL |
|
Location formats we accept:
|
Name |
Format |
Values |
Example |
|---|---|---|---|
|
Degrees, minutes, and seconds (Sexagesimal) |
DMS |
DecMinSec |
41°24'12.2", N 2°10'26.5"E |
|
Degrees and decimal minutes(Nautical / GPS) |
DMM |
DecMin |
41 24.2028, 2 10.4418 |
|
Decimal degrees(Decimal Degree) |
DD |
DecDeg |
41.40338, 2.17403 |
|
UTM(Universal Transverse Mercator) |
UTM |
ZoneDirectionEastingNorthing |
48 N 430960 4583867 |
Performing the import
Once you have your data sheet prepared you can upload it into the system.
-
Go to the settings menu → Assets → Asset Import
-
Drag and drop your file(s) in the foreseen dropbox and select the desired referencing and upload method.
-
Hit the "Analyse File" button below.
The system will now verify your sheet for errors, duplications and 16 other checks. You are changing your instance database and we want to be sure everything keeps running well.
If we find a problem that we can't handle, we will notify you and you'll have to modify your sheet and restart the upload process.
If you have a green note or acceptable warning messages, you can perfrom the upload! -
Hit the "Excecute Import" button
-
Review your changes in the map once the import is completed
A few words of caution: you are not able to undo this operation automatically, you would have to re-import your correct asset data if you did something wrong. But don't worry if you made a big mistake, contact us to restore your instance to a previous date, we take backups every 24hours of the system.
If you do not feel confident in changing your data or you need support to do so - you can always create us a ticket in the CORTEX Service ServiceDesk: https://adbsafegate.atlassian.net/servicedesk/customer/portal/11
If you have checked the "Create history entries for changes" marker then upon reviewing your changes you will see that in the history of those assets there is a note to say that asset data was changed. This can help you and your collegues to know about this action and will later be able to be used for filtering , knowing which assets have been modified in the past and when.
Changing asset's properties
To change a property it is important that the asset gets correctly referenced to the current asset in the system.
Referencing can be done through:
-
id
-
name
-
location
-
mapping table (pre-defined in the system)
The properties that can be changed are:
-
The name
-
The asset type
-
The main- and subarea
-
It's location in the world ( in lat/long)
See the file structure section in order to know which header names to use for the properties you whish to change when not using a exported reference sheet